00:00:00.000 --> 00:00:10.000
- A quick run through the frames used in making the focus edging image.
- The purple card sits above the desk and as it goes out of focus masks the desk detail.
Focus Stacking - A response to shallow depth of field.
Depth of Field
What is the Depth of Field?
The depth of field of an image refers to the portion of an image which appears sharp to the eye and in focus. Which covers a multitude of sins. The usual measurement of sharpness is the Modulation Transfer Function (MTF) which describes how an optical system resolves a pattern of close lines. I won't go into lots of details of how it works, but essentially the measurement is how well you can differentiate close lines, and hence fine detail. Which for macro work is pretty much what we're interested in, how much fine detail we can resolve. The sensor (or film) and the lens both have a maximum level they can resolve, and ideally you want the lens or optical system to be able to resolve finer detail than the sensor is capable of recording, otherwise the optical system becomes your limit.
The resolving power of a lens can be improved by good optical design and coatings and often the 'sharpness' it can resolve is reflected in the price. Macro lenses are often designed to maximise the sharpness, often at the expense of other optical features. Coatings often help with contrast and higher contrast images may appear sharper as the difference between 2 adjacent colours will be higher.
The resolving power of the sensor depends on the idea of a circle of confusion. This is a notional circle that is the size of the smallest resolvable detail and is often calculated mathematically based on the pixel grid size of the sensor. However that can be modified by an anti-aliasing filter or other glass in front of the silicon. Anti-aliasing (or optical low pass) filters are used to help with distortion of fine details by blurring them, sharpening them in post to resolve the detail without the distortion.
The apparent sharpness of an image also depends on the viewing conditions. Ideally you want to display an image at a distance and in conditions where the viewer can just resolve the finest details by eye, so the viewer sees all the details available, and doesn't perceive any blurriness. Printing technologies can impact this as well, such that it can be difficult to work out the optimum. Cover glasses or cases can impact the visibility of details, as can lighting, so an image that may seem sharp on screen may not when mounted.
All of which adds up to there being no one sharpness value that is perfect. For a given set of viewing conditions, which for argument we will say is constant henceforth, there is an acceptable level of sharpness which we will say is acceptable to a typical viewer.
Note the following diagrams are representations, they are not accurate, or intended to reflect actual measurement, they are illustrations of concepts.

The depth of field shown extends in front of the focal plane of the image (which ideally is on your subject somewhere) to a point where the sharpness has fallen below the level we consider 'in focus'. Similarly it extends behind the subject till the sharpness of a group of pixels falls to that same level. Conventional wisdom amongst landscape photographers is that the subject is ⅓rd of the way into the depth of field. For macro photography the depth of field usually falls off so sharply that we are more concerned with getting the focal plane on the subject.
Impact of Aperture

The aperture of the lens also changes the depth of field. It does this by blocking off axis photons from entering the pupil. The further a photon is from the focal point inside a lens, the less sharp it will be. So by reducing the aperture size, you block out of focus photons, and only allow in focus ones which pass through the focal point of the lens. In theory you could close an aperture to a point where only in focus photons pass through, but then you run into problems with diffraction from the aperture itself causing blurriness. The size at which diffraction occurs depends on the aperture's actual size, and may differ by lens. The other impact of a small aperture of course is less light and hence a longer exposure, or introducing noise by pushing the ISO of the camera to compensate electronically. This may lead to having an exposure that is impossibly long, or so much noise you can't resolve any useful detail. Lighting helps, but as you go beyond 1:1 the tiny field of view and narrow depth of field really compound quickly.

It's also worth noting that in the curves shown above the wider apertures fall off to a blur that is so large no detail can be distinguished. This can be really useful if you have something close to the lens, such as dust on the front element. This is thrown so far out of focus it becomes a large diffuse blur that vanishes compared to the image.
Conversely for the narrowest aperture you can see that the sharpness never falls that far, and for some wide angle lenses at narrow aperture then dust on the lens or the sensor may be visible. It also applies to some macro scenarios, where the zone of acceptable sharpness is very small, but there is a huge zone of not sharp enough that projects dust in the image. This happens with the Mitakon regularly as soon as you start closing the aperture, and I've had it with the bellows at maximum extent with the Contax 1.4x teleconverter fitted, which has developed a scratch that shows up in all frames.
Hyperfocal Distance
Just for completeness, Hyperfocal distance, which is not relevant really to macro photography is the closest point at which the image has acceptable sharpness from there to infinity, and is of great concern in landscape photography in judging the correct focus point to include the maximum foreground whilst keeping infinity acceptably sharp.
Impact of Focal Length
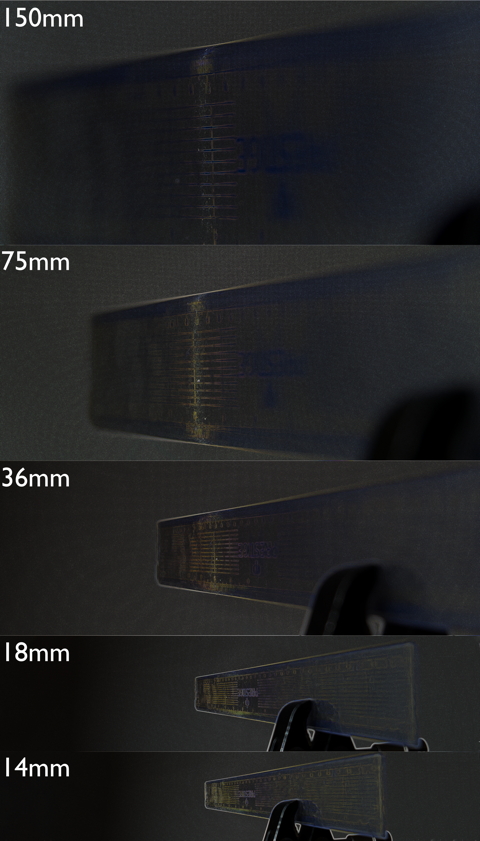
As the focal length of the lens increases so the depth of field reduces at the same aperture. To show this the following was shot at a range of focal lengths using the 14-150mm II kit lens at f5.6 (the widest it will go at 150mm). The subject is a ruler and focus is kept close to 50cm (the minimum at 150mm).
With Focus Peaking |
Without |
|---|---|
|

|
As you can see the depth of field decreases as focal length increases. From the EXIF data the depth of field at 14mm focal length is 250mm, at 18mm it's 130mm, at 36mm it's 30mm, by 75mm it drops to 6mm and at 150mm it's a scant 1mm, which happens to be the smallest the field can record. Looking at the image though I'd estimate that the depth of field is a shade over 10mm on my screen. So those figures may be pessimistic, or they just have a different specification of acceptable sharpness. I'd say at the wide angle end the sharpness is lower, but that's based on the readability of text that is much smaller, as it subtends a smaller angle at the wider focal lengths. This of course is subjective, and without using a test chart, impossible to quantify.
Field Curvature
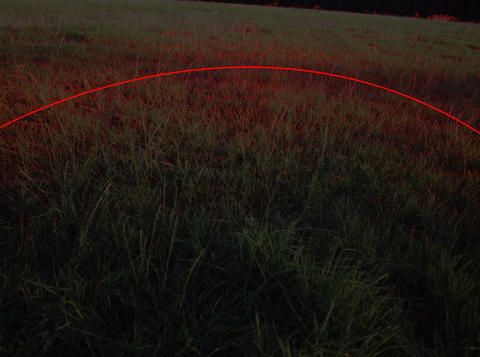
Another thing that contributes to problems in macro is field curvature in the lens. This is where the lens focuses all incoming light at the same distance. If we assume that the target focal plane is flat, then at the edges and corners of the frame the focus will be in front of the subject plane. Depending on the depth of field the corners may be acceptably sharp, but may look less sharp than the centre. For landscape photography it is not uncommon to focus or at least check focus in the corners, or at least as close as you can get to them.

I'm somewhat lucky in that most of my lenses are flat field corrected. For instance with my RedCat telescope for astronomy it is vital that the field is flat, and the lens is specifically corrected for that. For macro the flat field may not matter, depending on what you're shooting. If you have an insect filling the centre of the frame it may actually help to have some focus fade off at the edges. The other strategy that can be deployed is to stack, as the field curvature can be offset by the next frame.
The following 2 images show a curved field and a flat. The images are actually screenshots taken from FastRawViewer which has a quite aggressive focus peaking mode for fine detail. Screenshot then imported into Affinity and the lines approximated manually. The first is the Samyang 12mm f2.0, and I don't think it has a particularly bad curve, nor that it matters for the normal uses of this lens, even for astrophotography the lens performs well. The depth of field of the lens in normal use is so wide even at f2.0 that the curvature is hard to see at any distance, and even here the lens is at close to infinity focus.
The flat field comes from the 25mm f1.2, which is a highly corrected complex lens, designed to the highest standards, including dealing with field curvature. The 60mm is equivalent, as is the 90mm. Macro lenses are often corrected, and these 2 are both specifically so. The Tamron Adaptall system also has a 2x teleconverter which is flat field adjusted.

Focus Stacking
Focus stacking is the process of merging several images at different focus distances of the same subject to increase apparent depth of field. The images taken are therefore a focus bracket, where the images have correct and under and over focus points, and the capture of them is focus bracketing. I try to refer to the images as a bracket, but I do slip and call the set of images a stack sometimes. Stack and bracket are kind of interchangeable when talking about the images, but focus stacking and bracketing are different steps in the process.
In order to create a suitable depth of field therefore we can take multiple frames, with different focal planes and stack these taking the in focus areas from each frame and blending them. There are lots of pieces of software that can do this, I use Helicon Focus on the iMac after trialling both it and Zerene Stacker. Affinity Photo can also stack, but it is rare I use it mostly because it ties Affinity up and is comparatively slow.
In principle therefore you need a series of frames where the depth of field overlaps like this.

The stacking software will align and scale the images, then starting with the foreground take the relevant sections of the image moving into the background. This creates a deeper depth of field than you can get from one frame without introducing diffraction or having to offset a small aperture. As you get to smaller depths of field getting closer then you can only create a broader depth of field via stacking, as you can't stop down enough to extend the depth of field meaningfully anyway.
Ideally you want the frames to overlap, so that the stacking software does not find stripes with no, or poor, detail. However it is not unheard of for a stack to be poorly overlapping, due to various factors, not least human error. I've done it repeatedly when creating a manual bracket of images, and now err on the side of caution, usually having too small an aperture and lots of overlap.

That said, it is not the end of the world as long as the fall off is not too sharp, because you can recover detail or fake sharpness in post processing if you find yourself with a fantastic unique opportunity and an iffy bracket. The ability to rescue it depends on how far the intermediate stripes are out of focus. If they are only slightly substandard then all may not be lost. The example below is a sub stack of 1 in 14 images from the full bracket using depth map mode with radius 3. As you can see the bands of out of focus are stark and the image is not good.

By changing the radius to 50 the slightly out of focus pixels from the frames can be selected where they are within the radius of an in focus pixel. In this case you get an improved result because the out of focus bands contain pixels from frames where the pixels are less out of focus. The offset here is the wide banding you get where the focus edging is exaggerated. Always trade offs.

Movement
There are a number of options of what to move to get the focus bracket. Ignoring panoramic images where we want to create multiple stacked images and tile them, and just dealing with creating a single bracket, there are several options. The first and most obvious thing to consider is whether to move the optics and or camera, or to move the subject. To me there's an obvious problem to moving the subject which is that any fine details that move are not going to be simply replaced. For example if the stamen in a flower shifts, that can wreck the whole bracket, whereas if the subject is static any movement problems are limited to the camera and optics and can be compensated for potentially.
So in general I would say move the camera and optics.
If you have a lens which allows auto bracketing via AF system movements, then you have the choice of changing focus in the lens. For an internally focussing lens this is great, because the front of the lens remains static, whereas for an extending lens (e.g. the Tamron 90mm) changing focus moves the front element. If you start at the closest focus, then the lens will be focussing farther and therefore shortening which removes the hazard of hitting the subject (assuming you haven't already getting that closest focus). It does run the risk of changing the lighting if the lighting is close to the lens as the lens withdraws, but if you keep the lighting and lens sufficiently far apart and avoid shadows then it isn't a big risk.
Using the Mitakon there is little option but to move the camera and lens entire. The focus on the lens is based on magnification ratio, and the ring is seriously stiff, so any fine movements are impossible. This needs to be a focussing rail driven movement.
The bellows can be moved on a rail in the same way as the Mitakon, but there is another option available called bellows draw. With this you leave the front standard in the same place relative to the subject and move focus by moving the rear standard. The impact of movement of the rear standard is reduced roughly by the magnification ratio, so a 1mm movement in the standard at 4x magnification moves the focus 0.25mm or thereabouts. So to capture a 5mm bracket you will be moving the standard 20mm or so, which allows for quite a good overlap with manual movements. The problem with this is that you are reducing the magnification significantly to get to the background, and that means you lose magnification after stacking. The bellows draw image below doesn't capture the whole depth of field, but has already lost about 3% of the size. I suspect the full stack may have lost a lot more, but I thought the bracket had extended the full depth of field when I stopped, it was hard to tell as the magnification had dropped and I was working on the EVF.
Moving whole bellows |
Bellows draw, 3% less magnification |
|---|---|

|
|
Bracketing problems
This image exemplifies some of the problems you can get with a field capture. The lighting of the background and movement has lead to an unsightly pattern in stacking that needs masking out, and the highlights in the reflective surfaces show poor diffusion (for this subject) and mask details.

Backgrounds
Backgrounds can be a problem in macro at the best of times. If you use artificial lighting then you can end up with a low key image, where the background is black, or signifcantly darker than the subject. If you keep the background balanced, but use lighting to keep the subject lighting constant, then you can get a background where the lighting is changing, due to clouds or branches swaying, and the result is messy and blotchy. The background on a stacked image could be quite deep and therefore impossible to light or control and so you end up resorting to low key. So not only do you need to choose your background carefully you need to think about how it is lit and how it is changing over time. Which may only be obvious in post and a pain to fix.
Another problem is parallax. If the camera moves the subject may be able to be aligned between frames, but the background may suffer from parallax changes where the position of background elements in the images shifts from frame to frame relative to the subject, and the background cannot be independently aligned. This is often fixable if the background is way out of focus, but a smooth transition into the background and details just out of focus in the background may ruin a stack. Tripods or short stacks help here.
Lighting
This comes down to keeping the lighting constant or consistent between frames. The light source needs to ideally be constant, and not moving during the bracket. That may sound obvious, but if your light source is natural light filtering through a canopy, and looks stable, any breeze might suddenly throw your lighting right off. Ideally you therefore want either stable light, which usually means at least partially you use supplementary lighting, either flash or continuous. Flash gives more light, but I've found on long stacks my flash overheats and end up overpowering at least one frame in a run, losing frames from the bracket. I've also found in manual brackets that the TTL flash exposure can vary wildly. So continuous lighting is preferred.
The other problems with lighting I'll go into when I review lighting options, but amongst them are diffusion and reflective subjects.
In order to get good lighting on a subject you need the light source to be larger than the subject, and even. This is so that features are evenly lit from both sides and you don't get shadows masking details. With the flash that means diffusing evenly to at least the size of the subject. With the Manfrotto LED lights and the Mitakon ring light those both have discrete LEDs which show as hot spots and are hard to diffuse easily. The big flat LED panel has effective built in diffusion, but is harder to use and there's only one of it, so I tend to have to use a mirror on the other side in addition.
With reflective subjects even the best diffusion can still create specular highlights that mask detail. To reduce these a polarising filter can help. Ideally you'd have a polarising light source too, but the LEDs are not and I don't have a safe way to polarise them in the field. A polarised light source would be pricey as these tend to be microscope light sources for labs, and priced accordingly. The discrete LEDs in the Manfrotto lights can also become a nightmare with reflective subjects.
Poor Micro Contrast
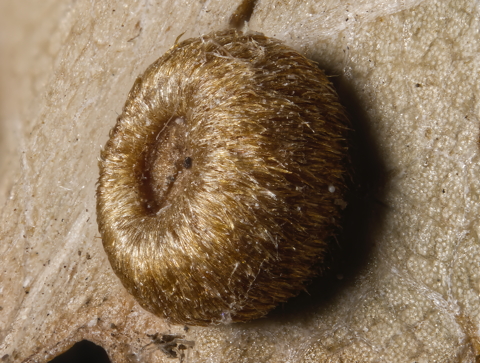
This is harder to demonstrate, but hopefully I can show it enough here. I've taken frames from the Mitakon and bellows brackets of the wasp gall with similar focus to show the difference in the unprocessed files. The Mitakon looks flat and low on detail compared to the bellows shot. You might think this is just exposure and overall contrast, and there is some of that, but if you click through and zoom right in, you can see that there is slightly less detail in the Mitakon shot. When processed you can see far more clearly a lot of the 'detail' in the Mitakon has become blown highlights and there is far less detail recovered than in the bellows image.

Bellows Final |
Mitakon Final |
|---|---|
|
|

|
This is probably the best argument against the Mitakon I've come up with so far. I keep getting ok images from it in isolation, but when you look like this, with the same subject, lighting, magnification and processing, the bellows is just better. I could possibly improve the Mitakon image, try to match the bellows for light and colour, but it still won't recover any more detail or be a better image.
Falling off the end of the bracket
Focus stacking gives you great power over the end of a stack, where you choose to stop including sharp pixels, as well as how you fall off. At a wide aperture you can have a very sharp fall off from in focus to out of focus, that creates almost cartoonish separation from the background, and it can be hard to narrow the aperture enough to replicate the natural fall off of the lens in use that you get in non macro photography. So the end image of a bracket you may want to close the aperture to control how the focus falls off to create a graceful transition from in focus to out of focus.
f2.8 throughout |
f11 end images added |
|---|---|

|

|
Focus Breathing and out of focus foregrounds.
I commented on this originally in the Optics essay.
Focus Breathing is the change in magnification ratio as the focus changes. It can be a nightmare for video as the frame zooms in and out with focus pulls, and therefore video lenses are often corrected for this. It can also be caused by moving the optical system in order to focus, so as the lens moves closer the framing tightens. So one of the key features when focus stacking is to align the images taking into account the magnification ratio. Fortunately this is taken care of by the software.
However it rears its head again when we start to deal with synthetic depth of field.

As you can see from this the purple card in the foreground is blurred in front of the background when the background is in focus. The result of this is you get a blurred edge to foreground elements when the total depth of field is far larger than the depth of field of an individual frame. The larger the aperture the more blur you get from the front elements of the scene and the worse the fringe. I have yet to find a good way round this completely. Using smaller apertures and shorter stacks rather defeat the main point of focus stacking. Tweaking the radius in Helicon where using method B depth map stacking has an impact and sub stacking is supposed to help, but I've not had any success with that so far. Effectively what you're trying to do is recover detail not in the image stack. The best I've done so far is to hide it using inpainting and clone tools to copy background detail from elsewhere into the affected areas, which is not good.
Transcript
Transcript
Subject Movement
Game Over. Subject movement is close to impossible to deal with. The stacking software is great at alignment of frames, based on the camera moving and the subject being translated slightly horizontally or vertically, or rotated, or zoomed. But as soon as the relationship of elements in the image changes, like the position of an antenna, or the juxtaposition of the antenna and a leaf in the background, then the stacking software is flummoxed and you are going to start getting ghosts if this movement is in focus at all. Fortunately if the movement is out of focus, then the stacking will likely erase it, but it can be impossible. One of the things you can do is if the bracket has excellent overlap (and I tend to overdo the overlap intentionally) then occasional frames can be omitted from the stack without impacting the rest of the stack, but if the movement covers several frames you can be stuffed.
In the following the antennae moved and I've restacked with the moved frames removed at a larger radius, then used a mask to blend the images. For a couple of hours work, you get a tiny improvement that could possibly have been fixed by simply reshooting at the time for a mostly static subject like this. I got several stacks with 2 different lenses and cameras with this bug, so while I wasn't happy with the ones from the 90mm which took longer to get and all had movement, the 60mm being quicker was better for the subject movement in this case.
With movement |
Movement patched |
|---|---|

|

|
Post Processing or faking it
I am not going to go into exhaustive detail here, but I am going to go over some of the options I use commonly. I'm intending an essay on post processing with a video and more details on exactly what I'm doing.
The basic premise at each stage is to preserve or enhance detail. To resolve detail visually as observed above you're looking at the contrast around the edges of details. This is called micro-contrast. Sharpening uses various techniques to find these edges and differentiate them further.
AntiAliasing
Aliasing relates to how the camera samples the incoming image and details are captured. There's a lot of maths I could start going into here, but if a detail is too small it will be lost because it doesn't cover enough pixels in the camera grid. This defines the so-called circle of confusion that is used to calculate depth of field. If a feature is large enough it covers several pixels and will appear sharp, but if it crosses the grid at an angle it may become jaggy and hard to see. You're probably looking at a screen which uses antialiasing to deal with that. In the case of a computer screen or a printed page then fonts can become jaggy and lose detail, so fonts are antialiased, that is some blur is added that makes the jagged lines look more solid. This is synthetically retaining detail that might be lost by a grid that is misaligned or too small.

As you can see the antialiased text is more readable, and this is used in cameras with an antialiasing filter to help improve the capture of fine details. So being critically sharp actually may reduce the visibility of fine details.
Antialiasing also combats moiré which is where a pattern in the subject is at a frequency that clashes with the image grid size and you get false colour effects. This is why TV presenters rarely wear clothes with small patterns or textures, because you can get this awful false pattern appearing that is very distracting. It's something you have to avoid in printing and this is done by having different grids per colour channel, something the camera can't really do. Antialiasing filters help with it however.
To reverse the impact of antialiasing the camera then sharpens the image as it converts it to the final representation. If you shoot RAW this is done (or not) by your RAW processor.
Noise Reduction
In Affinity are 3 sections which can affect detail in RAW processing. The first one to reduce is luminosity noise reduction. This can't tell if the micro contrast between this pixel and the next is detail or noise for small features. As you increase the noise reduction larger and larger details will get blurred. So I leave the colour noise reduction on because that is quite good at spotting false colour created by noise, which looks different to detail in most cases. I suspect there's an insect out there with primary and secondary coloured micro textures that look just like colour noise, but I've not photographed one that I know of.
Detail enhancement
On the same tab is detail enhancement. This improves detail at the cost of increasing noise, and can blow highlights. It is worth applying, it probably makes the most difference of any filter to improving the image, but you need to work out where the radius and strength give the best result for the least extra noise. This involves moving both to the maximum and then reducing radius slowly looking for the point where it suddenly blurs. When you find this, move back till the blurring goes, then do the same with the strength. At this point the signal to noise ratio is optimal.
Clarity
This one can be tricky. It works on the top end of the histogram, and it works in out of focus areas as well because it is not looking for detail rather it applies over the whole image unless masked. If the detail is in the highlights, where for example you have very pale hair structures, then clarity can improve the detail, but mid tone detail or dark details are not enhanced. The trade off here is that you might increase clarity and get no improvement to the subject, but the background suddenly looks posterised, where a smooth background suddenly develops previously unseen patterns. So sometimes if the subject details are not in the highlight end of the histogram you might end up reducing clarity, with no loss in details. Try it and see what works for each image.
Clarity also has the potential effect of making slightly out of focus areas look in focus where improving highlight contrast can be enhanced. This is not the primary use, but conversely it can also be used to push a busy background back by blurring those details in out of focus areas.
Post Development Noise Reduction
Once I've developed the image without luminosity noise reduction I throw it at Topaz Denoise AI. I'm still using a v2 version due to issues with the early releases of v3. This does 2 things, it handles the luminosity noise more intelligently than Affinity as well as sharpening. In fact I use it more for sharpening without adding noise than removing noise in most cases. I tend to use the auto option in the default Denoise mode as it seems to work well for my images.
Unsharp Mask
Once back from Topaz, I apply an unsharp mask to get the last fine details. For this I ramp the factor to 4, the maximum and move the radius up till I get the best edge enhancement without creating fringing on the details. I then ease the factor back in the same way as above, moving it back slowly looking for a drastic change in sharpness then moving to just before that drop off. Finally if the mask is picking up residual noise and enhancing that, I add between 1 and 3% threshold to reduce that, without hopefully losing the boost to the smallest details.
With a few images I've found benefit to applying unsharp masks with different radii to bring out different size details. Generally if I find there are 2 places when moving the radius slider that look good, I'll try adding a second filter.
High Pass
I used to use a High Pass filter to boost edges and enhance contrast, but it tends to blow highlights and of all the options can look fake very quickly. To do it apply a high pass filter and set the blend mode to one of the light options, usually soft or vivid. Then increase the radius to boost the edges. It uses frequency separation to find edges and adds light to them which is why it blows pale highlight details if you're not careful, but works well with darker detail. It can be managed through opacity too. I generally don't bother with it but it's a useful trick up my sleeve.
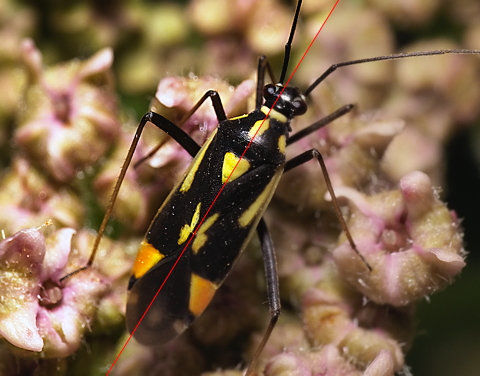
Output
With some colour, curves and levels tweaks, the following shows on the left the final output, contrasting with on the right the file exported from Olympus Workspace unmodified. The result has more detail visible, but the unprocessed version is not bad. This is a crop of the actual image to show the subject, the picture has more context to show the whole beetle in situ.