

Extreme or Ultra Macro Flowers and Seed Heads.
Here are a range of the very much larger than life images I've taken of flora, specifically here flowers and seed heads. The majority are studio shots, usually of picked or cut samples, but I have always wanted to be able to do these images in nature.
There are a number of problems to getting these images. The subjects are very close to the lens, and the field of view very small. This means that the depth of field is small compared to landscape photography, that there is not much light coming into the camera, from the small area, and any movement is significant. As usual there need to be compromises.
To deal with the depth of field first, this can be increased by closing the aperture or by focus stacking. For some of the optical systems used here closing the aperture is not relevant, either because there is no aperture (microscope objective) or it is in the wrong place (reversed lens on bellows). Stacking therefore becomes the way to go as the magnification ratio increases. That introduces its own problems. The first relates to movement. Fortunately for flowers this is controllable in the studio, even though at the highest magnifications even breathing in the direction of the target can cause problems. Good lighting helps by reducing exposure duration, which helps with sharpness and movement reduction, and allows, where possible, to stop down. Movement of petals in the wind is almost impossible to control in the wild, and it needs a still day and some luck. Even clamping a flower does not prevent petals being ruffled. Sometimes however you find another source of movement, and that is tiny insects or arachnids hiding in a flower or seed head. The number of shots I've had spoiled by some tiny insect wandering across a focus stack, necessitating manual removal in post processing is high.
Increasing the depth of field via stacking has another problem with manual optics. At lower magnification ratios it's possible to get good stacks using a manually controlled rail. I have a couple of tricks to this, involving multiple rails. I've started to use my Novoflex rails in the studio for coarse focussing, then use the worm drive Manfrotto rail to do the actual steps. However at higher ratios the manual adjustment needed is too tight for the drive, and the drive from one frame to the next can skew laterally. I bought a so called precision rail, thinking it could improve this, but the precision was in the steps it took, which were larger than I was getting from the Manfrotto, and the lateral skew per turn of the drive was much larger. I ran a simple 5x test with the Mitakon and the new 'precision' rail frames failed to even stack, even with generous latitudes in Helicon for inter frame movement. The solution is an automated rail like the Wemacro, Stackshot or Cognisys rails, but those come with a high price tag, and software compatibility concerns, especially for field use. The other possible solution is a microscope stage transport, but those recently shot up in price by over 3x, putting them about half the price of the cheapest powered rail, which given they also don't have ¼ 20 screw holes and would need a mount makes them expensive to experiment with.
The second problem relates to the stability of lighting. When focus stacking you want consistent exposures of the subject and background. For the studio the lighting can be completely controlled, but in the wild the subject lighting can change wildly between one frame and the next, even when using focus bracketing in camera. If you only light the subject then the unmodified background lighting can fluctuate wildly making unpleasant backgrounds when stacked. To avoid this in the wild is hard, and usually involves darkening the background by increasing lighting on the subject relative to the background, typically using flash. The problem with flash is that I've found for large stacks you get inconsistent (but not bad in isolation) exposures between frames. Some are a little lighter or darker than others. On long automated focus brackets the flash occasionally overheats and fails to fire mid stack, which is a pain, so I try to reduce the flash power as much as possible by using smaller apertures to reduce number of shots in the stack, and higher ISO to reduce flash exposure. Continuous lighting is more stable, but not as bright for high magnification ratios.
Most of the images below are focus stacked using Helicon Focus, or occasionally Affinity. Helicon is my first choice for stacking, but occasionally a sequence will not stack well in Helicon, and Affinity often does a better job where Helicon is struggling. Most of the time though Helicon is better and usually a lot faster.
The last problem in the studio with cut flowers is heat. Even in water cut flowers can wilt visibly between exposures, and lighting of course can increase the rate of decline. The only answer I have to that is to try to compromise between cutting flowers and dealing with wind outdoors.
Gear.
This covers the evolution of my extreme macro from the film era lens and bellows through a custom lens back again to bellows for the highest magnifications along with specialist field kit. There will be a couple of deep dives into gear coming, but these are some of the results from over the years.
Camera Settings.
For the most part these are stacks taken using Aperture priority, supplementary lighting of some description, either continuous or flash, and ISO 200. For field work the ISO goes higher where I'm not using a flash, but stacking often helps with that by smoothing. I've developed a custom mode with manual exposure control for flash based work in the field with the 60mm with or without the Raynox or teleconverter, and this also works with the microscope objective.
Pictures.
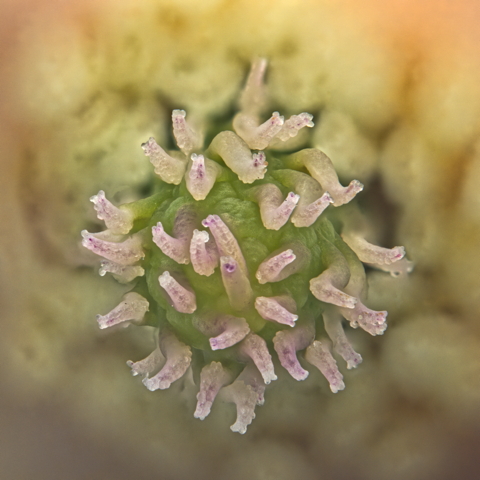
Tentacles!
The first is one of the oldest stacked extreme macro shots I have. It's been processed more than once, and is a view down the stamen of a Star Magnolia from the garden. Field of view is small, the spike is perhaps 3-4mm wide. The base of the central spike is maybe 10mm wide. This was shot using the Contax auto bellows with the Carl Zeiss 50mm f1.4 lens mounted not reversed. The lighting is daylight, and the focus adjustment is done using the Manfrotto rail, turning the worm drive ⅛th turn per exposure. Aperture was f16, not the sharpest for the lens but ensuring maximum overlap between frames, and the frames were shot using the Olympus tripod high resolution mode. The light is natural from the window taking ¼ second exposures. So each frame took quite a few seconds to take. HD mode was set with a 2s delay, 8 frames with pixel shift, and moving the focus probably meant I was getting a couple of frames per minute. This predates the reversing ring for the Nikkor 50mm, the Manfrotto lights, flash and so on. At the time this was my main way of getting beyond 1:1 magnification. If I repeated this now I'd use the 60mm with teleconverter and Raynox 250 to get the same magnification probably and use the Olympus Capture software to handle focus stepping.
After some training and shopping the next image was taken in the field with the Mitakon 1-5x macro lens. This was a single frame at 5x magnification using the supplied ring light, that is sadly now defunct and I can't get ZYOptics to talk to me about replacing. Though they now explicitly list it as not covered by warranty on the lens page, sadly they don't offer it separately, which is a shame because it had more use than the lens. ISO was pushed up to deal with the wind, even clamped, and as you can see the sharpness is not great, even at the optimum aperture for this lens. The magnification is 5x though so it's pretty big for a field image. One observation though, when you see in second hand adverts 'lens contains some dust which will not interfere with the performance of the lens' that is not true for this lens. It seems to be a dust magnet, and the dust shows up strongly in exposures. Any dust on the sensor is also going to show up too, so I spend more time cleaning the optics using this lens than any other. Taking this now, I've no idea what else I could do, the bellows are not field friendly and this needed to be a single exposure at the time.
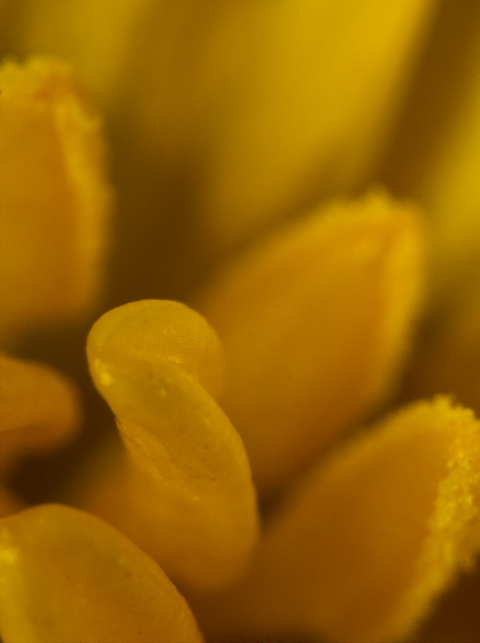
Back in the studio, this was the Mitakon playing to its strengths. Again the ring light, but only at 2x magnification and HD mode. The out of focus areas are creamy with this lens when it works well. This is a stack, at f5.6 probably. This lens benefits from lots of light, the more the better. As soon as the sensor has to work at all, either on a long exposure or higher ISO the images start to suffer heavily. Despite a big working distance, this is not really a great field lens and needs stacking.

These giant dandelion like seed heads appear after the early actual dandelions, and while beautiful are hard to transport back to the studio. This is a field shot with the 60mm Macro augmented with the Raynox 250 and using the new main flash for exposure. Aperture was dropped to f4 to get the depth of field I wanted here, and magnification is probably around 1:1.5 only. I've included this as an early example using the Raynox in the wild.

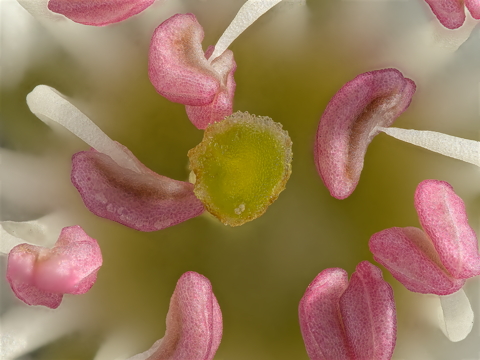
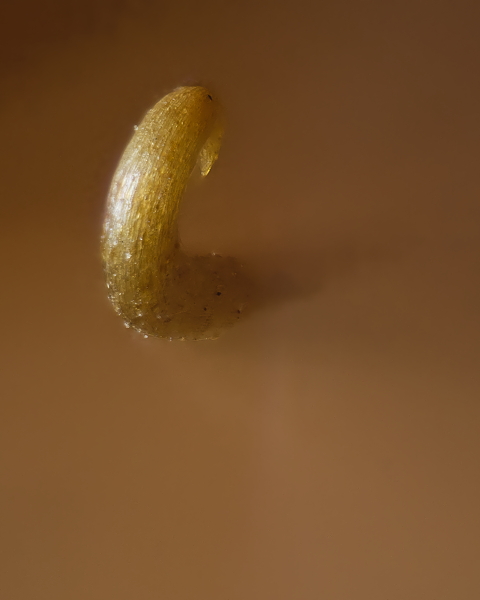
Until I bought the microscope objective this held my personal record for magnification. The stamens and anthers are tiny hairlike structures with the naked eye, but when magnified this far you start to get the wonderful textures of the reproductive organs and petals. Kit wise this is the Nikkor 50mm reversed onto the bellows at maximum extension, then the Contax 1.4x converter at one end, and the Raynox 250 at the other. Crank it in till it's almost touching and flood the area with as much light as you can using the continuous lights. Focus bracketing was done using the Novoflex rails with the micro adjuster fitted, which allows for 50 micron steps if carefully controlled. Again there is lateral skew from the drive, but it works well enough. HD mode to screw every last iota of detail from the subject. The biggest issue here is I could probably have benefitted from a polarising filter to reduce glare from the micro structures, but there wasn't really any space for one.
Over the years my red and white parrot tulips have all disappeared and the deep purple Queen of the Night planted alongside them have started to develop parrot feathering to the petals. There are still traditional Queen of the Night but the candystripe coloured parrot tulips have gone, to be replaced by a dark red/purple parrot which when in the bud has some yellow variegation. This is an early example of adding the teleconverter to back of the 60mm with an extension tube or two buffering the connection, whilst putting the Raynox on the front getting to a little over 3x magnification. Despite the small aperture of f14, which in theory is diffraction limited there is plenty of sharpness and detail in the petal. I might try this again next year with the bellows in the garden and stack it, to see if there is more detail available at 3x, but what makes this is the colour, not the fine detail.

I've shot the acer a few times, often at night. The flowers are tiny delicate structures which don't last if cut, so they are best shot on the tree. This is daylight, but lit by the little Manfrotto lights supported on a 15mm Smallrig rail. The flower is held by a clamp, and shot upside down. This is 121 image stack at f5.6 with the image rotated 180 degrees. In previous images its been possible to see very little of the micro detail here but with this setup I was amazed to see the spiral structure. I think this has a lovely architectural feel to it like some fantasy minaret tower from the Hyborian age filmed by de Laurentiis.

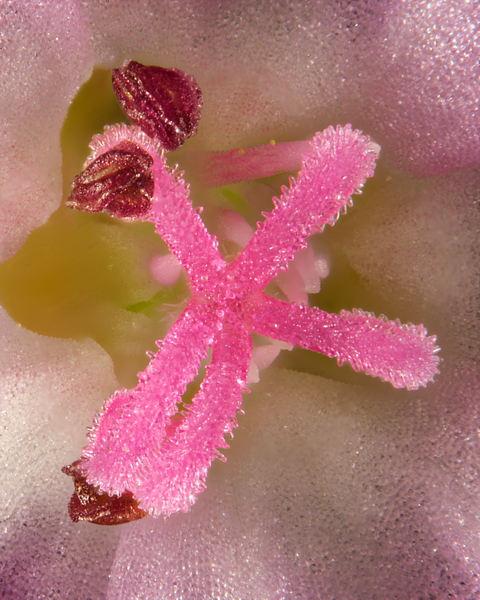
Another example of using the rails and extreme macro gear in the field. This is the 15mm rail system supporting a new cheese plate that has the 2 lights and clamp mounted on it. They are holding a hawthorn flower up to the lens, in this case with a polarising filter on the Raynox. This is a 248 image stack. One of the mistakes I make in the field is not connecting to an electronic trigger like the OI.Share app on the iPod/iPad to start a stack. The problem that causes is that the first few images, usually 2 but sometimes more, get an offset from the shock of pressing the shutter button. There is no option to delay the start of the stack. Of the multishot options only HD mode seems to have a default pause built in. So ideally you need a shutter release. I don't like wandering round with the iPod in the backpack or wherever with the screen on while connected to the camera, and connecting for anything trivial is a nuisance. Ideally I should get a wired shutter release, but it never gets to the top of the wish list. Or do what I did here, focus in front and delete the first couple of frames. This was another situation with a tiny insect potentially getting in shot, but in this stack it has wandered out of sight. I did take images with the flower horizontal, showing the insect hiding, but it is so tiny and so mobile it didn't stack well and they aren't great as single frames.
Back to persevering with the Mitakon in the studio. I'd already taken some good head on pollen shots and decided to try a side on view. The petals are deliberately creating a pink mist with only the heart of the flower in focus. By this point the lights had died pretty much, and this was reduced lighting at maximum magnification. To deal with the light the lens is wide open at ISO 800, which is not ideal and nearly 1s exposure. The EXIF contains a calculated EV value, and the majority of the work in this essay has a value of 10 +/- 2. This has a value of 0.3, showing just how dark it is. This is really pushing the lens to the limit and I intend redoing this with the microscope objective and probably flash at some point.

We finally come to the latest generation of gear. This is the microscope objective on the bellows at maximum magnification of 18x. The burdock is a head I brought back a couple of years ago and shot with the bellows. The seed head has been sat in my sample tray ever since. Getting the microscope objective and adapters to put it on the bellows as a tube lens I immediately wanted to test it, and this came to hand. This is a single hook with manual stepping on the Manfrotto rail. Between shots I made sure of the alignment of the image on the computer, putting a bit of leverage into the screw to keep it close. This was actually shot quite quickly and I was amazed how bright and sharp the microscope was at this level of magnification. The depth of field of individual frames though is tiny, and manual transport is getting close to impossible here.
Having tried the microscope objective in the studio I decided one night to try it as a field lens. This is the lens, screwed into an RMS to M43 adapter which is screwed in turn into a Fotodiox M42 to C/Y adapter. That is on the front of a 13 mm C/Y extension tube because the M42 to C/Y adapter is so thin and hard to handle on its own. That goes into the Rayqual C/Y to M43 adapter which has an annoying foot on it, and so that has a 16mm M43 extension tube on the back of it to give room to use the camera body tripod screw for plates which is more robust. The optical tube length is less than the 160mm that the lens is optimised for but gives a 5.6x magnification. Used with the flash this is handheld, focussing using the sway back and forth method. The subject is a sticky bud showing the little hooks and a very small slice of the surface texture. Framing is the hardest thing to do here handheld. Focus is not easy, but the field is about 3mm wide, and so hard to compose via the back screen when held low to the subject like this. It will be a lot easier with subjects I can reach looking through the EVF. This rig has a base plate into which there is a magic arm screwed so I can get the diffused flash over the top of the microscope objective, using an off camera cable, so it becomes quite bulky even though the lens itself is tiny. The narrow lens hopefully makes it less triggering for some insects. The issue is the tiny depth of field and how to make the most of it handheld.

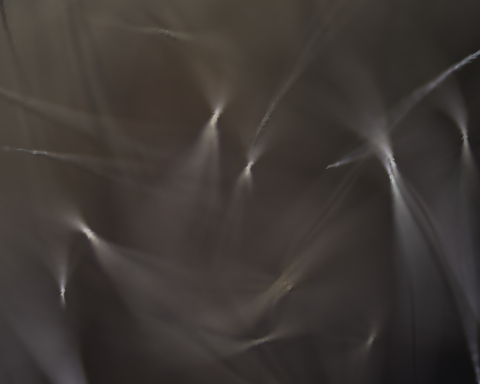
Which brings us to this. On the same night I shot the sticky bud I was pushing the objective into the fluff of sow thistle seed heads. The tiny depth of field suddenly becomes an interesting way of creating abstract art, showing the micro structure of the subject in a different way. Weirdly in my search for high magnification, depth of field and light, I've found something beautiful without needing huge stacks of images and tripods and rails and racks and clamps. Which just goes to show something the abstract art course showed me, sometimes technical excellence gets in the way of a good picture. So this is dedicated to Eva, the instructor, who challenged me to apply abstraction in my wildlife and nature work.
Post Processing.
When I started I was using Skylum Luminar which has some filters around micro structure enhancement that gave some basic sharpening. As time has gone on I moved to Affinity Photo which is much more of a classical and technical tool for photographic editing. It may be less artistic in use, but for me it's more reproducible and understandable. I use the Develop Persona to apply detail enhancement, but I have stopped using the luminosity noise reduction there. Instead all images are fed from that module to Topaz Denoise for sharpening and noise reduction, usually using the Denoise profile in auto mode. I then apply unsharp mask. I used to apply a low level of unsharp mask and then a high pass filter, but I've started to tune the unsharp masking and found the high pass unnecessary or not to my taste any more. Images here span 3 years though and may be processed in a number of ways. Stacking is generally done in Helicon to a DNG file, but HD stacks are pre-developed in Olympus Workspace to a TIFF first.
References.
Eva Kalpadaki Eva lead an abstract photography class at Wex and unlike most photo courses has subtly influenced me and my work in ways I hadn't anticipated. I didn't at the time think a lot of her teaching, but it has had a long term impact, so I have to say that in the long run it was actually good.